Now is a good time to clean your garden tools!
Spring is almost here (yes I know, it's still far away 😅) and that means it's time to take out your gardening tools to take care of your garden. But before you start gardening work, it is essential to clean your tools. In this article, we'll tell you why it's important to clean your garden tools and how to do it correctly so they stay in good condition throughout the season.

Why is it important to clean your garden tools?
Cleaning your garden tools is more than just a household chore. This is an essential step to maintain their effectiveness and extend their lifespan. Here are some reasons why you should take the time to clean your tools:
Prevent the spread of diseases and parasites
Garden tools can easily carry diseases and pests from one plant to another. If you don't clean your tools regularly, you risk spreading these pests throughout your garden. By cleaning your tools, you eliminate bacteria and fungal spores that could cause health problems for your beloved plants.
Maintain the effectiveness of your tools
A well-maintained garden tool is a tool that functions perfectly. When you remove accumulated dirt and rust from your tools, you ensure that they continue to perform well. A clean, sharp tool can easily cut, trim and dig effortlessly, allowing you to complete your gardening work more efficiently.
Extend the life of your tools
By cleaning your garden tools regularly, you extend their lifespan. Dirt, mud and rust can cause irreparable damage to your tools if not treated promptly. By cleaning and drying your tools properly after each use, you protect them from humidity and prevent corrosion.
How to clean your garden tools correctly?
Cleaning your garden tools is not complicated at all. Here are some simple steps to follow:
Step 1: Remove soil residue
Use a nylon brush or spatula to gently remove remaining soil and debris from your tools. Be sure to clean all parts, including handles and blades.
Step 2: Wash your tools
Fill a bucket with warm soapy water and dip your tools in it. Use a sponge or brush to gently scrub surfaces and remove stubborn stains. Remember to rinse thoroughly with clean water to remove any soap residue.
Step 3: Dry your tools thoroughly
It is crucial to dry your garden tools thoroughly after cleaning them. Wipe them with a clean, dry cloth to prevent rust from forming. If necessary, you can use a little oil to protect the metal parts.
Step 4: Store your tools properly
Once your tools are perfectly clean and dry, it's time to store them properly. Hang them on a wall rack or put them in a storage box to protect them from moisture and wear.
By following these simple cleaning steps, you will ensure that your garden tools remain in good condition and ready for use at all times. So remember, take a few minutes to clean your tools now and make your life easier throughout the gardening season!
Articles you may like
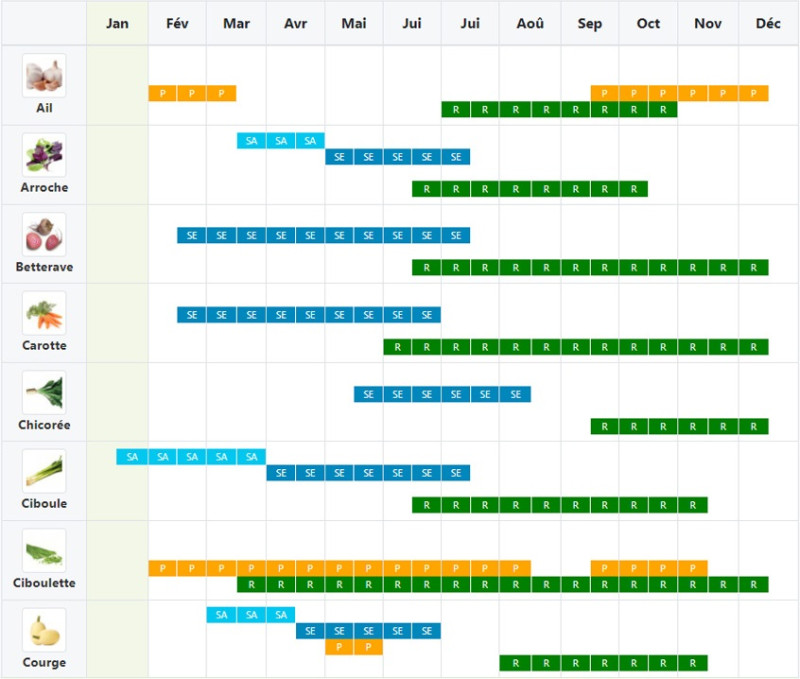
My annual calendar
View the main sowing, planting, and harvest periods for your favorite plants, then print or download these markers to prepare your season.